the Hydrological Cycle
|
Objective: To understand (and remind ourselves) how the hydrological cycle works
There is rather an annoying video to watch to start you off. Sorry, it'll probably be in your head for the rest of today! Click here to be taken to the geographyalltheway page for the Hydrological Cycle. Task 1 - Complete the Global Hydrological Cycle Worksheet only. No GATW? Click here to access a blank hydrological cycle diagram and use the information below to complete it. Click here to be taken to the Greenfield Geography page. Scroll down to the section on the hydrological cycle. |
Make sure your print out your geographyalltheway worksheet and put it into your files in the rivers section.
|
River Processes
|
Objective: To understand the processes that affect rivers.
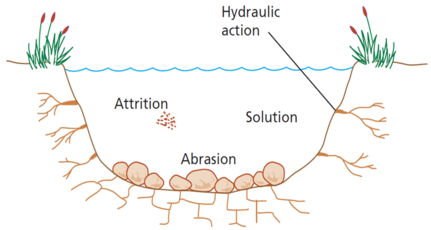
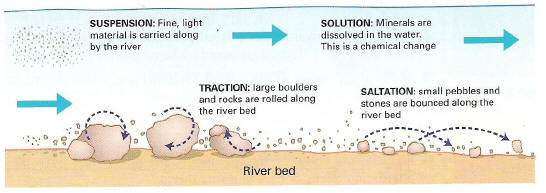
There are three main processes that affect rivers and their valleys. 1. Erosion & Weathering 2. Transportation 3. Deposition Task 1 - Turn to page 8 on the interactive OCR B textbook on your computer. Copy the definitions of the four main processes of erosion into your book (you should remember these from your coasts work). Next to each one, you should draw a quick cartoon to help you remember how this process works (the best will be featured here) For those with no access to the OCR B textbook, click here and scroll down to 'River Processes (Erosion, Transportation and Deposition)' and take a note of the processes and make a neat copy the diagram to the right. Task 2 - Make a table in your book. The first column heading is 'Natural Factors Affecting Erosion' and the second one is 'Human Factors Affecting Erosion'. Read the information on page 8-9 then copy in these factors into the correct column with a full description. For those with no access to OCR B textbook, click here and make a spider diagram with the factors summarised. Task 3 - Underneath your table, make a copy of the left hand side diagram of Fig 1.9 on page 9 and add the annotations. Task 4 - Make notes on transportation & deposition in your Geography work books. No access to OCR B textbook can use the link in task 1 to take these notes. |
Source: www.coolgeography.co.uk
Source: Greenfield Geography Wiki
|
Source to Mouth - La Garonne
|
Objective: To trace the Garonne river back to its source in the Pyrenees and learn about the features associated with the upper course of the river.
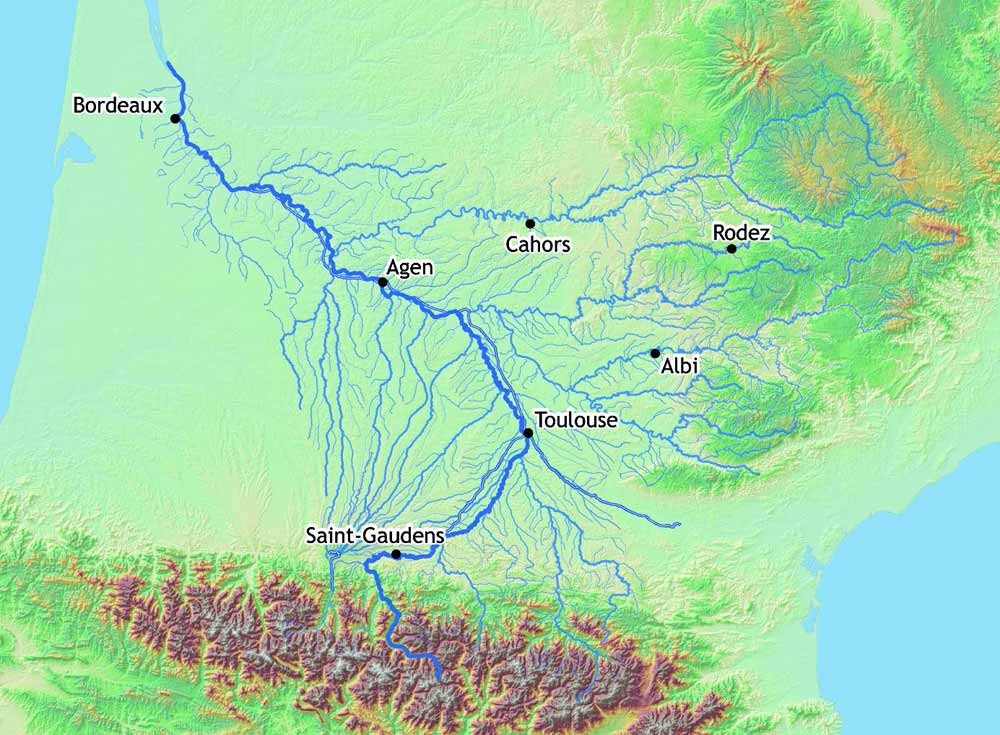
Starter: Study the map of the Garonne watershed to the right. Take a copy of this map and complete a written description of the Garonne using the following sentence to get you going. The Garonne has its source 2600 metres up in the Spanish Pyrenees above the town of Vielha. The river takes a north west course through the Pyrenees before turning east towards the settlement of Saint-Gaudens (you continue........) Background Task - Study the cross section diagram to the right hand side, take a copy and use text boxes to annotate on the approximate locations of the following settlements: 1. Saint-Gaudens 2. Toulouse 3. Agen 4. Bordeaux You'll need to use Google Maps to help you. Also label one of the tributaries as Le Tarn and the name of the ocean body that it flows into. |
Upper, Middle & Lower Course
Case Study - River Garonne
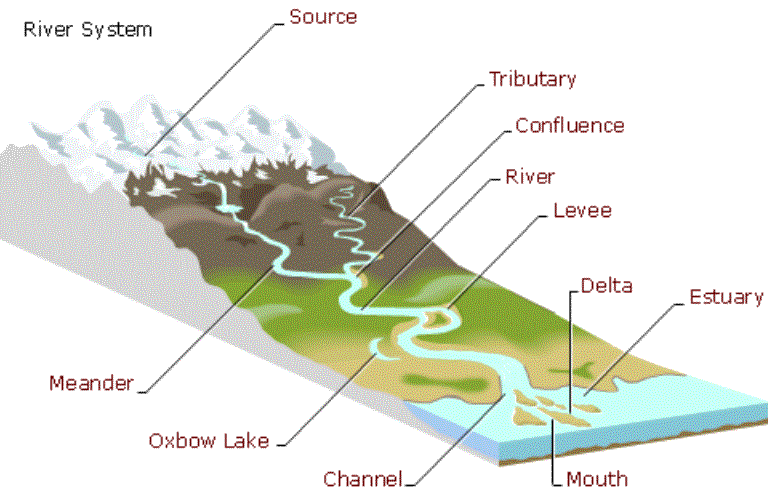
We are going to be using our nearest major river, Le Garonne, as our case study for this section of the course. If you have been to Toulouse before and stood on Pont Neuf, you will have seen this river, one of the biggest in France. Any river, anywhere in the world can be split into three sections. Number 1 is the upper course (think high up in the mountains). Number 2 is the middle course (where it comes down into the lowlands). Number 3 is the lower course (where it is at its widest and most powerful and enters the sea). This is also known as the 'River Long Profile'
Use the zoom facility to go to each of the blue markers and read the description. Start at the source and work your way down to the mouth of the Garonne.
Use the zoom facility to go to each of the blue markers and read the description. Start at the source and work your way down to the mouth of the Garonne.
View River Garonne - Upper, Middle & Lower Course. in a larger map
Upper Course of La Garonne
|
Task 1 - Copy & Complete (choose from words below)
In the upper course of any river, ________ is always the main force because the _________ of the river is steep and it has a lot of energy, especially during _____ ______ and heavy rain. The main process of erosion is __________ and this causes _________ and vertical erosion of the banks and the ____ of the river. Remember that the conditions in the Pyrenees can be harsh and therefore weathering can affect the slopes of the valley. Landslides and ______________ can carry materials down the slope and into the river where it is _____________ away. This often makes the valley steeper and gives it a ____________ appearance. snow melt, transported, erosion, V-shaped, avalanches, gradient, abrasion, lateral, bed Task 2 - Watch the video to above & right that explains processes in the upper course. Using this (& fig 1.11 on p.10 of the OCR B textbook), create a three part cartoon diagram to show the formation of a v-shaped valley and interlocking spurs. No access to OCR B textbook? Click here for more information on V Shaped valleys and here for information on interlocking spurs. Task 3 - Study the Google StreetView images below. The first is of an area close to the source of the Garonne and the second near Vielha. Have a good look around. Take a screenshot and complete a piece of writing describing the typical characteristics of this upper course area of the river. |
|
|
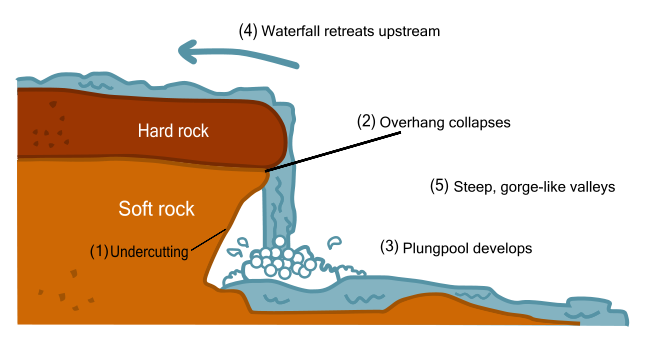
View River Garonne - Upper, Middle & Lower Course. in a larger map Waterfall FormationWaterfall: Waterfalls are where water descends vertically. Waterfalls are usually created by a change in rock type. As the river moves from hard rock to soft rock, erosion increases creating a waterfall.
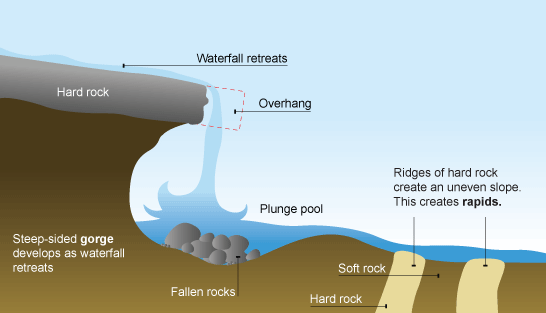
As the water falls over the waterfall it erodes the river bed and the bottom of the waterfall. This makes a plunge pool and causes some undercutting. The undercutting creates an overhang which will eventually become too heavy to be supported and collapse into the plunge pool. The whole process then starts again, which means the waterfall is constantly retreating upstream towards the source. As the waterfall retreats it leaves behind a gorge. Gorge: A gorge is a deep sided valley left behind when a waterfall retreats. Task 1 - Use an annotated (you draw) sketch to explain the formation of a waterfall and a gorge. |
View River Garonne - Upper, Middle & Lower Course. in a larger map |
|
|
|
White Water Rapids - Formation
|
OK, so some of you have experienced rapids on the PGL trip in Year 7 & 8, others of you may have done it in your own time on rivers around the world.
Starter: Watch the video to the right hand side. Task 1 - Note taking (on the following) Rapids are sections of rough turbulent (white water) water. They are normally in a river's upper course and are formed when you get layers of hard and soft rock. The layers of soft rock erode quicker than the layers of hard rock. This makes the bed of the river uneven creating rough turbulent water. Rapids can become popular with tourists who want to raft down them. Some of the most popular rafting rivers are the Nile in Uganda and the Zambezi in Zimbabwe. Task 2 - Make a copy of the the right hand side of the diagram to the right to show how bands of hard and soft rock cause rapids. |
|
|
Pothole Formation
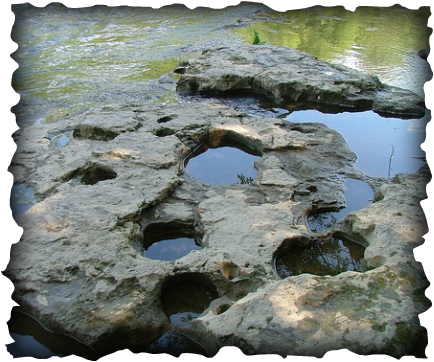
You have perhaps heard of potholes in roads and have certainly felt one as you have been driven over them in your car. However, they also exist in the bed of a river and are formed over time. Starter: Take a look at this animation. Task 1 - Using this animation and your own research, create a mini factsheet that details how they form and what factors determine how fast or slowly they develop. |
Middle Course of La Garonne
|
Objective: To learn about the features associated with the middle course of the river Garonne.
Task 1 - Turn to page 12 of the OCR B Geography textbook** and define and explain the formation of a meander. Here is some higher level info. Then: a. Visit the embedded map underneath and find a place marker that identifies a meander on the Garonne. b. Zoom right in and change the view to Satellite c. Take a screen shot of the image and annotate it with the information from fig 1.16 on page 12 of the book. d. Underneath your screen shot, draw a sketch that shows a cross-section through a meander and label. **Don't have the OCR B Textbook, an alternative source of online information can be found by clicking here Task 2 - Carry out the same instructions above but for an Ox-Bow lake. You will need to add further annotations to fig 1.17 to show why the lake forms. This link will help you out. |
|
View River Garonne - Upper, Middle & Lower Course. in a larger map
Lower Course of La Garonne
|
Objective: To learn about the features associated with the lower course of the river Garonne.
Task 1: i. Watch a few seconds of the video to the right and then cast your mind back to the Google Street View image of the source of the Garonne. There have been some major changes. ii. List down the top three differences you see when you compare both. iii. Using the map embedded above, find a suitable Google Maps (satellite view) of the mouth of the Garonne and take a screen shot. Annotate it (like the meanders & oxbow lakes) with theory information from page 13 of the OCR B textbook or check here to show features and formations. Task 2 - Click here to be taken to the geographyalltheway section on floodplains and Levées. Complete the worksheet before printing it out and placing into your Geography folder. No access to GATW? Click here and scroll down to the information on floodplains & levees. Make notes on the formation of both fluvial features and compliment this with an image or diagram of each to help with your revision later. |
|
Delta Formation
|
Deltas: When a river meets the sea its velocity suddenly reduces. This reduction in velocity means that much of the rivers load is deposited at the mouth of the river. If the river deposits quicker than the sea can erode then a delta starts to develop. Deposition can mean that the main river channel gets blocked, forcing the water to find alternative routes to the sea by making distributaries. Deltas have very fertile soil and tend to be excellent for farming. There are three types of delta; arcuate, cuspate and bird's foot.
Distributary: A distributary is a small river or stream that breaks off from the main river in deltas. Flocculation: This is the process of particles (load/sediment) joining together. Salt can cause flocculation, so when freshwater meets the sea (saltwater) particles are likely to flocculate. If they flocculate they become heavier and are more likely to be deposited. Review Task - Major Exam Practice Explain the change in the shape and characteristics of a river as it travels from source to mouth (8) |
Task 1 - Click here to access the geographyalltheway.com section on Deltas. Download and complete the worksheet using the resources available.
No access to GATW? Click here and scroll down to the information on deltas & levees. Make a note of each of both types of delta and then find an image before annotating around the main features. |
RSA Animated Videos
|
Objective: To create a 2 minute animated RSA video to answer the following question.
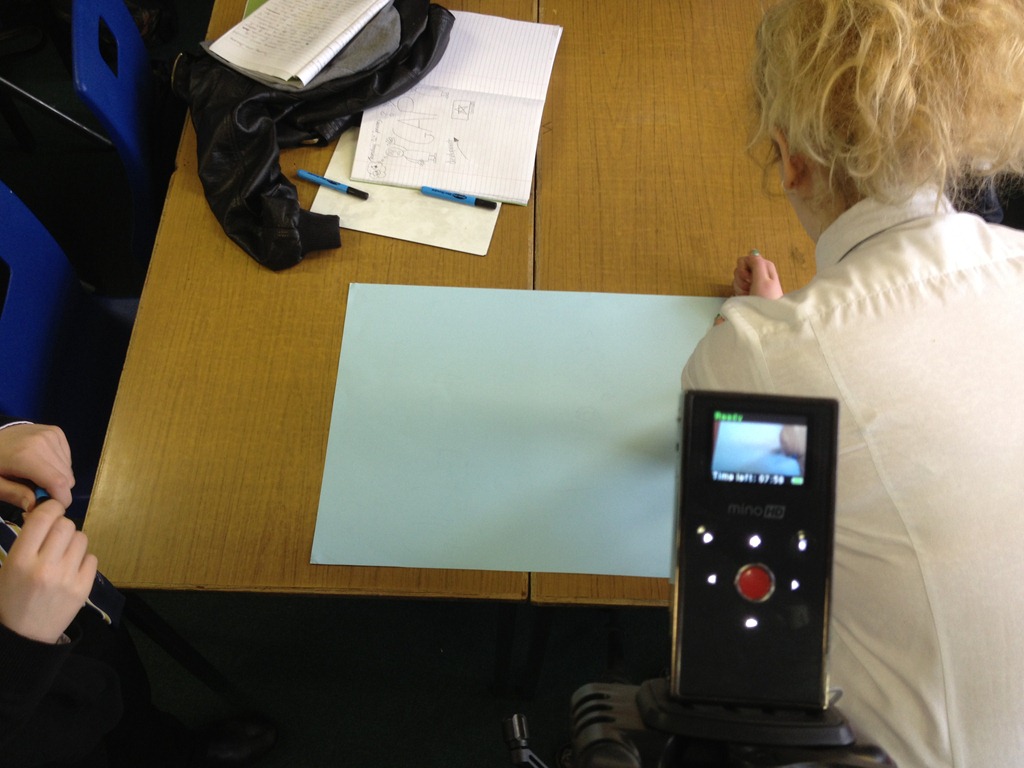
How do physical processes and relief change the shape and functioning of the River Garonne as it travels from source to mouth? Starter: Watch these great RSA videos produced by Y10 students at the Priory School in Portsmouth this week. Their work was on factors affecting development (like you in Y10), but you get the idea. Note: The filming was done first and then sped up. The narration was then added later using a script. Resources: 1 x Camera + Stand 1 x Marker Pen 1 x A2 Paper Movie Maker for narration. Getting Started: Look carefully at the first four slides of the embedded presentation below. This was used by the Y10 group and made by their teacher, Mr Rogers. Part 1 - Decide on an introduction to the task. Part 2 - Split your animation into three stages (upper, middle, lower course) and think how you are going to show the processes and resultant features at each stage. Part 3 - The conclusion. Answer the question and wrap up the video with a clear summary of your production. Consider this ....How are you going to introduce the animation (drawing) and the narration? Link to what you have learnt so far Work out how your diagram is going to develop. You need to practice drawing it on scrap A3 paper so that you are able to do it in ONE TAKE for the final film. Film your animation (could take up to 40 minutes in real time) using the tripod so that the image is steady doesn't shake around. (see photo to the right). Speed the video time up to 2 minutes and script and narrate a voice-over to go with the video. Peer review time ..... |
|
Thanks to Noel Jenkins and David Rogers for blog posts and allowing me to use their examples on this site. Always great to have examples of good practice for students to see.

